

Introductory workshop about Micronaut.
Software Requirements
In order to do this workshop, you need the following:
-
Linux, MacOS or Windows with WSL and shell access, with the following installed:
-
curl. -
wget. -
unzip. -
git.
-
-
-
Recommended to be installed with SDKMAN!:
sdk install java 21.0.7-graal.
-
-
A valid Docker environment with the following image pulled:
postgres:latest. -
Ensure that the current JDK is GraalVM for Java 21:
$ java -version
java version "21.0.7" 2025-04-15 LTS
Java(TM) SE Runtime Environment Oracle GraalVM 21.0.7+8.1 (build 21.0.7+8-LTS-jvmci-23.1-b60)
Java HotSpot(TM) 64-Bit Server VM Oracle GraalVM 21.0.7+8.1 (build 21.0.7+8-LTS-jvmci-23.1-b60, mixed mode, sharing)
Clone this repository
Once done, you can clone this repo:
git clone https://github.com/alvarosanchez/micronaut-workshop.git
You will find each lab’s template files on each labNN folder. Solution is always inside a solution folder.
To highlight the actions you actually need to perform, an icon is used:
|
Application architecture
Throughout this workshop, you will be creating a football (soccer) management system.
-
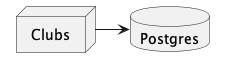
clubsis the microservice responsible for managing clubs. It uses Micronaut Data JPA as a data access layer.
1. Getting started with Micronaut and GraalVM (~30 minutes)
Change to the lab01 directory to work on this exercise
|
There are multiple ways to create a new Micronaut application:
-
Using the Micronaut Launch web application.
-
Using the Micronaut
mnCLI. -
Using
curlagainst thelaunch.micronaut.ioAPI to download a ZIP.
1.1. Using Micronaut Launch to create a new application (5 minutes)
We will use the third option, so that you can copy/paste the commands.
To see the options available, run:
curl https://launch.micronaut.io
Micronaut Launch uses features as building blocks to create a new application. Features can contribute to the application in different ways, such as adding build dependencies, configuration properties, sample code, etc.
Let’s create a new application with the following command:
curl 'https://launch.micronaut.io/create/default/com.example.micronaut.hello?lang=JAVA&build=MAVEN&test=JUNIT&javaVersion=JDK_21&features=graalvm&features=control-panel' --output hello.zip
You can now unzip the file and open the resulting folder in your IDE.
1.2. Running the application with the Micronaut Maven Plugin (5 minutes)
The Micronaut Maven Plugin provides a convenient way to run your application from the command line.
To run the application, execute:
./mvnw mn:run
You can leave the application running while you work on the rest of the exercise, since the plugin will automatically restart the application when it detects changes in the source code.
| Micronaut applications can also be run from the IDE. Refer to the IDE Setup section of the Micronaut documentation for more details. |
1.3. Creating a Hello World controller (5 minutes)
Create a new controller with a single endpoint /hello/{name} that returns a greeting message using
the provided path variable.
Click to expand
@Controller (1)
public class HelloController {

    @Get("/hello/{name}") (2)
    public String sayHello(String name) { (3)
        return "Hello " + name;

    }
}| 1 | The @Controller annotation marks this class as a controller on the default / route. |
| 2 | The @Get annotation marks this method as a GET endpoint on the /hello/{name} route |
| 3 | The name parameter matches the path variable in the route. A typo in either of them will result in a compilation
error. |
1.4. Testing the application (5 minutes)
Since the application is still running, you can test it using curl:
Open a new terminal and run:
curl http://localhost:8080/hello/World
While manual testing is useful, writing an automated functional test is even better. Micronaut provides a super-fast and convenient way to write functional tests using the Micronaut Test library.
Generated applications include a sample test that asserts that the application startups successfully.
Open src/test/java/com/example/micronaut/HelloTest.java and add a new test that asserts that the
/hello/{name} endpoint returns a greeting message.
Click to expand
@MicronautTest
class HelloTest {

    @Inject
    EmbeddedApplication<?> application;

    @Inject
    @Client("/") (1)
    HttpClient client;

    @Test
    void testItWorks() {
        Assertions.assertTrue(application.isRunning());
    }

    @Test
    void testSayHello() {
        String response = client.toBlocking().retrieve("/hello/World");
        assertEquals("Hello World", response);
    }
}| 1 | The @Client("/") annotation will inject an HTTP client connected to the embedded server random port. |
Before running the test, let’s add a Logback logger to see the details of the HTTP client.
Open src/main/resources/logback.xml and add the following logger:
<logger name="io.micronaut.http.client" level="trace" />Now you can run the test from your IDE or from the command line:
./mvnw test
1.5. Packaging the application into different formats (10 minutes)
The Micronaut Maven Plugin provides a convenient way to package your application into different formats, such as a fat JAR, a Docker image, or a native executable. For more details, refer to the Packaging section of the Micronaut Maven Plugin documentation.
To create a fat JAR, run:
./mvnw package
Once finished, you can run the JAR:
java -jar target/hello-0.1.jar
To create a Docker image, run:
./mvnw clean package -Dpackaging=docker
Once finished, you can run the Docker image:
docker run -p 8080:8080 hello
Micronaut applications can be compiled to native executables using GraalVM. This allows you to create a single self-contained executable that can be run without a JVM.
To generate a native executable, run:
./mvnw clean package -Dpackaging=native-image
On modern hardware, this should take about one minute.
Once finished, you can run the executable:
./target/hello
You will see that Micronaut starts in a few milliseconds.
Test the application again with curl:
curl http://localhost:8080/hello/World
1.6. Exploring the Micronaut Control Panel (5 minutes)
The Micronaut Control Panel module provides a web UI that allows you to view and manage the state of your Micronaut application, typically in a development environment.
The control-panel feature was added when we created the application using Micronaut Launch, so all you need to do is
run the application and open a browser and navigate to http://localhost:8080/control-panel
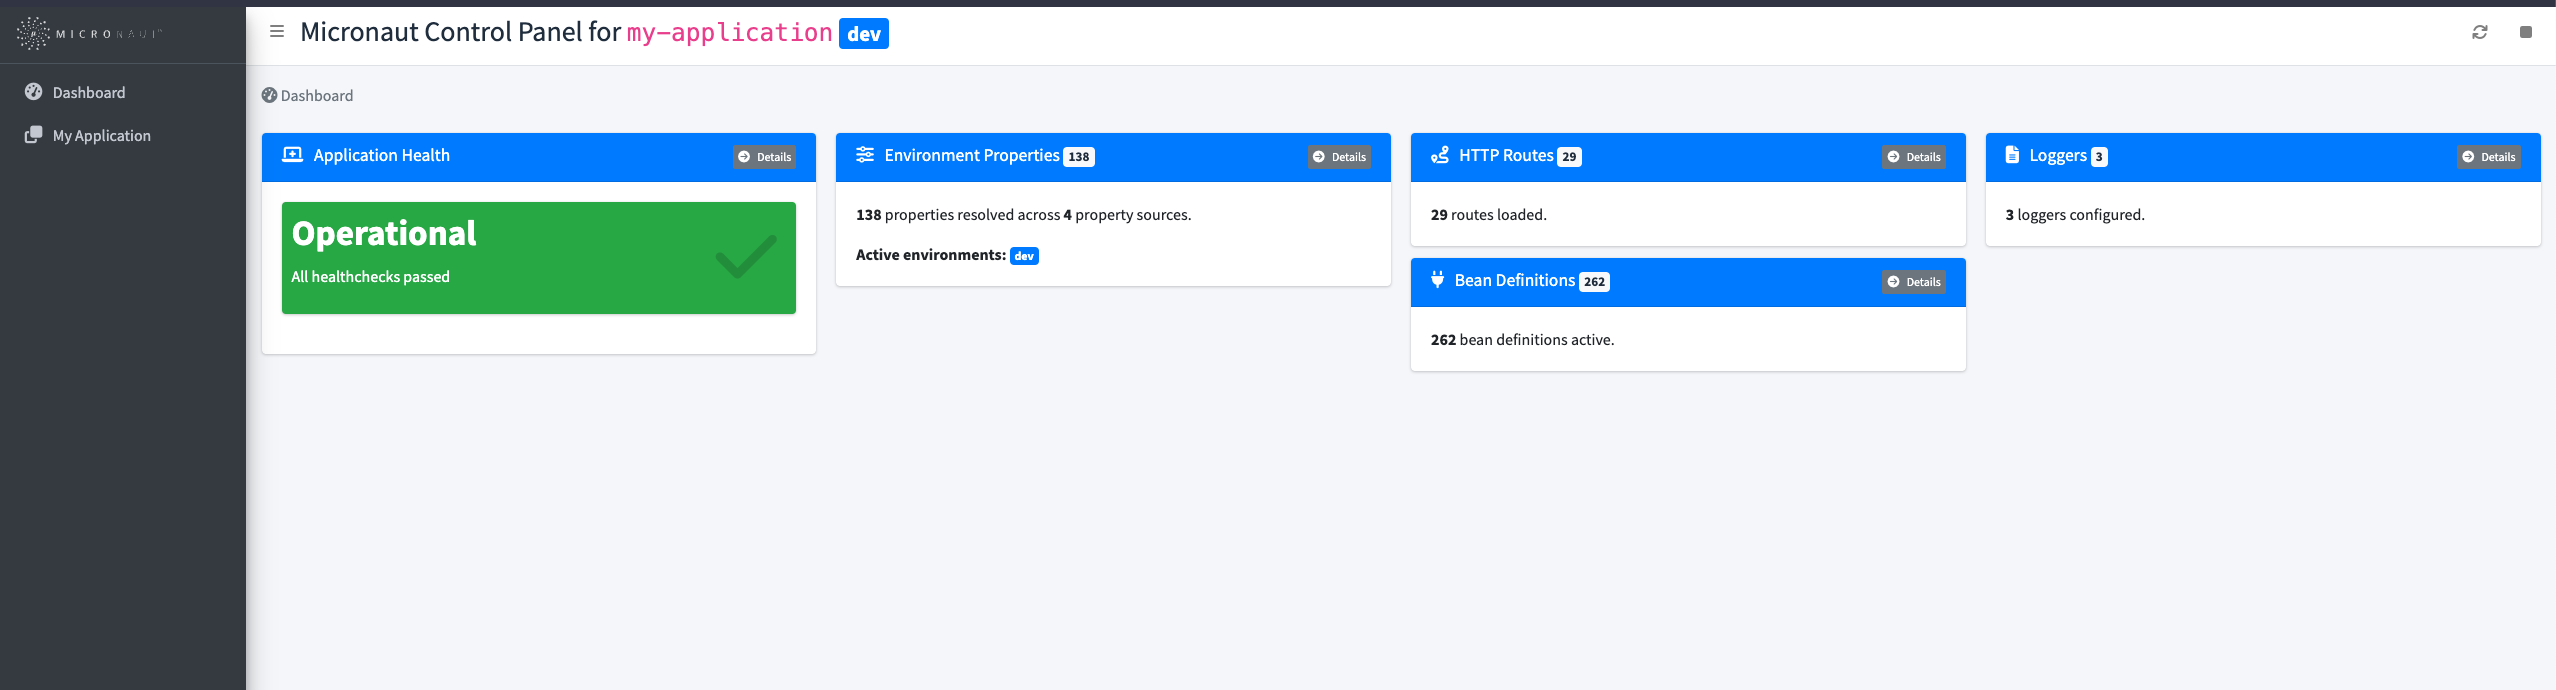
| Check the Micronaut Control Panel documentation for more details. |
2. Implementing a data access layer with Micronaut Data JDBC (~90 minutes)
Change to the lab02 directory to work on this exercise
|
In this exercise, you will create a data access layer using Micronaut Data JDBC. This library provides a convenient way to create repositories that can be used to perform CRUD operations on a database.
For development and testing on a real database, we are going to use PostgreSQL via Micronaut Test Resources.
2.1. Preparing the project (15 minutes)
Before going any further, make sure you have a recent version of postgres:latest pulled in your Docker environment.
Execute the following command
docker pull postgres:latest
Now, create a new application:
curl 'https://launch.micronaut.io/create/default/com.example.micronaut.clubs?lang=JAVA&build=MAVEN&test=JUNIT&javaVersion=JDK_21&features=graalvm&features=data-jdbc&features=postgres' --output clubs.zip
Unzip clubs.zip and import the project in your IDE.
Also, to set up the schema and add some sample data, we are going to use
Micronaut Test’s @Sql annotation.
Create the following migration files:
Click to expand
src/main/resources/create.sqlcreate table stadium(id SERIAL PRIMARY KEY, name TEXT, city TEXT, country TEXT);
create table club(id SERIAL PRIMARY KEY, name TEXT, stadium_id INT, FOREIGN KEY (stadium_id) REFERENCES stadium(id));src/main/resources/data.sqlinsert into stadium(name, city, country) values ('Santiago Bernabéu', 'Madrid', 'Spain');
insert into stadium(name, city, country) values ('Camp Nou', 'Barcelona', 'Spain');
insert into stadium(name, city, country) values ('Old Trafford', 'Manchester', 'England');
insert into stadium(name, city, country) values ('Stamford Bridge', 'London', 'England');
insert into stadium(name, city, country) values ('Parc des Princes', 'Paris', 'France');
insert into stadium(name, city, country) values ('Stade Vélodrome', 'Marseille', 'France');
insert into stadium(name, city, country) values ('Allianz Arena', 'Munich', 'Germany');
insert into stadium(name, city, country) values ('Signal Iduna Park', 'Dortmund', 'Germany');
insert into stadium(name, city, country) values ('Juventus Stadium', 'Turin', 'Italy');
insert into stadium(name, city, country) values ('Giuseppe Meazza', 'Milan', 'Italy');
insert into club(name, stadium_id) values ('Real Madrid', 1);
insert into club(name, stadium_id) values ('FC Barcelona', 2);
insert into club(name, stadium_id) values ('Manchester United', 3);
insert into club(name, stadium_id) values ('Chelsea', 4);
insert into club(name, stadium_id) values ('Paris Saint-Germain', 5);
insert into club(name, stadium_id) values ('Olympique de Marseille', 6);
insert into club(name, stadium_id) values ('Bayern Munich', 7);
insert into club(name, stadium_id) values ('Borussia Dortmund', 8);
insert into club(name, stadium_id) values ('Juventus', 9);
insert into club(name, stadium_id) values ('Inter Milan', 10);src/main/resources/clean.sqldrop table club;
drop table stadium;Also, to prevent Micronaut Data’s built-in schema generation to conflict with the schema we are going to create, you need
to remove the following line from application.properties:
datasources.default.schema-generate=CREATE_DROP2.2. Implementing the entities (20 minutes)
For the data access layer, we are going to use the Micronaut Data library in its JDBC flavour. In the source code, we will use standard JPA annotations.
Add the following dependency:
<dependency>
  <groupId>jakarta.persistence</groupId>
  <artifactId>jakarta.persistence-api</artifactId>
  <scope>provided</scope> (1)
</dependency>| 1 | It is in provided scope to make it available during compilation, so that the Micronaut annotation processor can
generate the corresponding beans, but it is not included in the final JAR since at runtime we will not use JPA but
Micronaut Data JDBC. |
Create the following entity model:
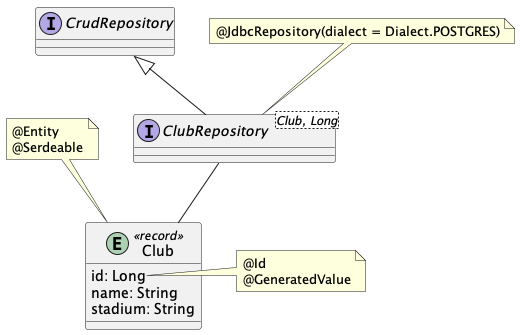
-
Clubis a JPA entity, so it is annotated with@Entity. It has a@OneToOnerelationship withStadium. The@JoinColumnannotation is used to specify the column that will be used to join the two tables. The@Idand@GeneratedValueannotations are used to specify that theidfield is the primary key and that it is automatically generated by the database. -
Stadiumis another JPA entity. It is also annotated with@Entity. -
ClubRepositoryis a Micronaut Data JDBC repository. It extendsCrudRepositoryso that it inherits the basic CRUD operations. It is annotated with@JdbcRepositoryso that it is recognized by Micronaut Data JDBC. Thedialectattribute is set toDialect.POSTGRESso that the queries generated at compile time work with PostgreSQL. The@Joinannotation is used to specify that thestadiumfield should be eagerly fetched when querying theClubentity.
We can write a simple test to make sure everything is working as expected.
Create the following test:
Click to expand
@MicronautTest
@Sql({"classpath:create.sql", "classpath:data.sql"}) (1)
@Sql(scripts = "classpath:clean.sql", phase = Sql.Phase.AFTER_ALL)
class ClubRepositoryTest {

    @Test
    void testItWorks(ClubRepository clubRepository) { (2)
        long clubCount = clubRepository.count();
        assertTrue(clubCount > 0);
    }
}| 1 | The @Sql annotation is used to execute the SQL scripts before and after the test. |
| 2 | Micronaut can inject dependencies in test methods. |
2.3. Implementing the data transfer objects (15 minutes)
In this REST API, the club and stadium are represented together. The fact that they are separate entities is an implementation detail that should not be exposed to the client. To solve this, we are going to create a data transfer object (DTO) that represents how the clubs are rendered.
Create the following DTO:
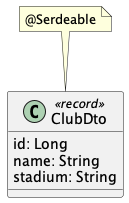
The @Serdeable annotation is used to indicate that the class can be serialized and deserialized by
Micronaut Serialization.
To map from the entity to the DTO and vice versa, we are going to use Micronaut’s built-in bean mappers.
Create the following mapper:
Click to expand
@Singleton
public interface ClubMapper {

    @Mapping(to = "stadium", from = "#{ club.stadium().toString() }") (1)
    ClubDto toDto(Club club);

    @Mapping(to = "stadium", from = "#{ this.getStadium(club) }") (2)
    Club toEntity(ClubDto club);

    default Stadium getStadium(ClubDto clubDto) { (3)
        String[] parts = clubDto.stadium().split(" \\(");
        String[] location = parts[1].replace(")", "").split(", ");
        return Stadium.of(parts[0], location[0], location[1]); (4)
    }
}| 1 | The @Mapping annotation is used to specify how the fields should be mapped when a custom mapping is needed between
fields. Fields whose names are the same are automatically mapped. In this case, we need to map the stadium field
from the entity to the stadium field of the DTO. The string representation of the stadium is determined by
Stadium::toString. The value of the from attribute is using
Micronaut’s Expression Language. |
| 2 | For the reverse mapping, we need to unwind the previous conversion and parse the string into a Stadium object. In
this case, we are using a default method in the interface, which is called from the Micronaut expression. |
| 3 | The parsing implementation splits the string into the different fields of Stadium. |
| 4 | Stadium::of is a utility method to create a Stadium object from a name, city, and country. Please create such a
method in the Stadium class, passing null for the id field. |
Ideally there should be a StadiumDto and implement its own mapping from/to entities in a less fragile way that
does not imply string parsing. But for the sake of simplicity, we are going to use the current approach.
|
2.4. Implementing the service layer (15 minutes)
Since we don’t want the controller to interact directly with the repository, we are going to create a service layer that encapsulates the business logic. This service layer will use the repository and the mapper to perform the operations.
Create the following service:
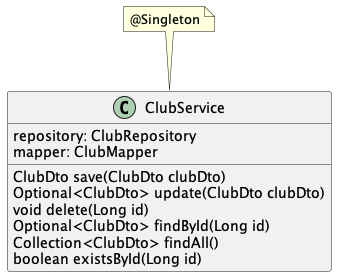
If in doubt, check the solution in the lab02/solution directory.
2.5. Implementing the REST API (15 minutes)
Create the following REST API:
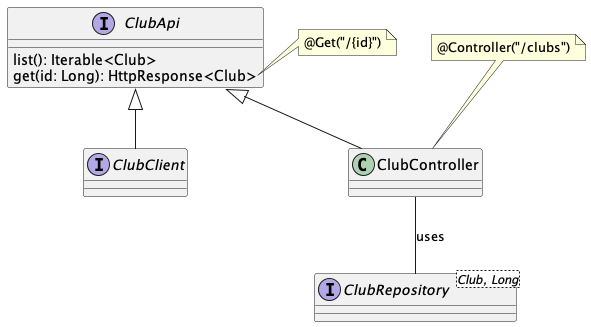
-
ClubApiis an API contract with REST operations. It will be implemented byClubController, and aClubClientwe will create later. For each method annotated with@Get,@Post,@Put,@Delete, etc., Micronaut will figure out how to render the corresponding JSON response based on the return type, which can be POJOs or collections of POJOs, or wrapped inHttpResponsewhen we need to customise the response (header, response codes, etc). -
ClubControlleris a Micronaut controller. It is annotated with@Controller, and usesClubServiceto implement the operations.
The HttpResponse has some static methods
to create responses with different status codes, headers, etc.
|
We can now write a functional test for this REST API. In this case, instead of using the low-level HTTP client, we are
going to use a declarative client. For this, we are going to leverage the ClubApi interface we have just created.
Create the following test:
Click to expand
@MicronautTest
@Sql({"classpath:create.sql", "classpath:data.sql"})
@Sql(scripts = "classpath:clean.sql", phase = Sql.Phase.AFTER_ALL)
class ClubControllerTest {

    @Inject
    ClubClient client; (2)

    @Test
    void testItCanListClubs() {
        var clubs = client.list();

        assertFalse(clubs.isEmpty());
    }

    @Test
    void testItCanGetAClub() {
        var response = client.get(1L);
        assertEquals(200, response.code());

        ClubDto club = response.body();
        assertNotNull(club);
        assertEquals("Real Madrid", club.name());
    }

    @Test
    void itReturnsNotFoundForUnknownClub() {
        assertEquals(404, client.get(100L).code());
    }

    @Client("/clubs") (1)
    interface ClubClient extends ClubApi {}
}| 1 | The @Client annotation is mapped to the same path as the controller. The implementation of this interface will be
generated by Micronaut at compile time. |
| 2 | The @Inject annotation is used to inject an instance of the generated client. |
In order to see the HTTP requests and responses, and also the SQL queries, we can declare the following loggers
(nested in the <configuration> element):
src/main/resources/logback.xml<logger name="io.micronaut.data.query" level="trace" />
<logger name="io.micronaut.http.client" level="trace" />2.6. Completing the REST API (15 minutes)
Using the knowledge acquired in the previous exercises, you can now complete the REST API by implementing the following endpoints:
-
POST /clubs: creates a new club. -
PUT /clubs/{id}: updates an existing club. -
DELETE /clubs/{id}: deletes an existing club.
Augment the functional test to cover the new endpoints. Test also negative cases such as providing non-existing IDs, or invalid payloads.